
OYSTER GARDEN BLOCK INSTRUCTIONS


Once you’ve created the ideal environment, you’re ready to get growing!
Still need help deciding where you should grow your Garden Block? Click here to check out our tips for setting up the perfect growing area.
1. Using a sharp, clean knife, carefully cut a 3 inch long “X” across the center of the side of bag (opposite the label). Let the blade sink in about 1/4 inch into the block. Do not remove the grow block from the bag.
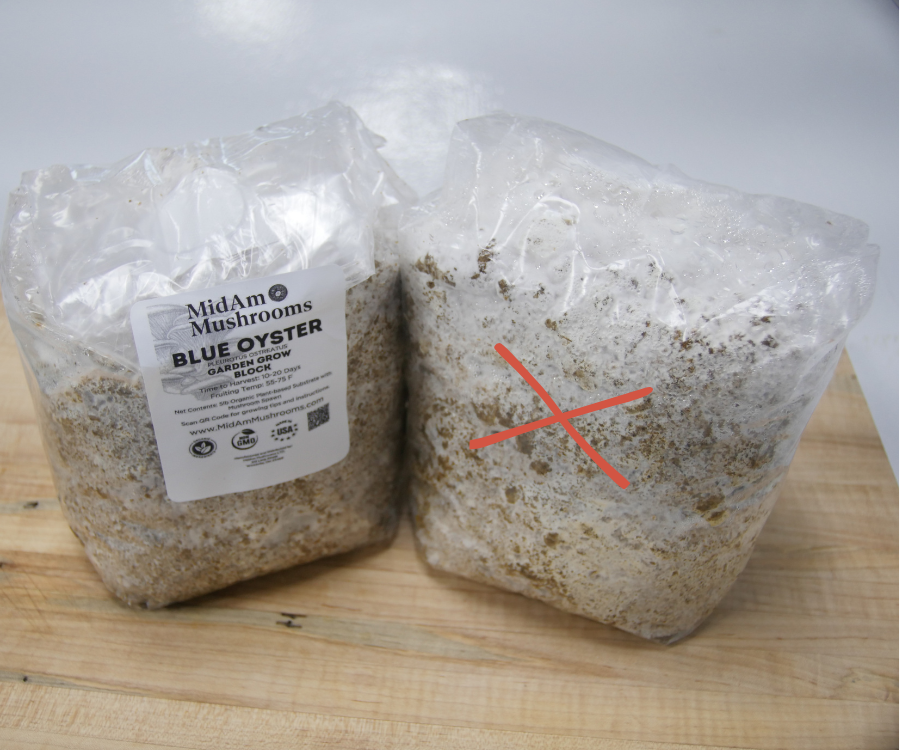
2. Thoroughly mist the area you just cut, both the block and bag. Gently lift the flaps to spray underneath.

3. Place your block in your chosen growing location and continue to mist the block (or fruiting chamber) 2-3 times daily with clean water.
4. Your mushrooms should begin growing (pinning) within 7-14 days. Continue to lightly mist your oyster mushrooms when humidity levels are low.


5. Your mushrooms will be ready to harvest 5-10 days after they first begin to grow. Oyster mushrooms are ready to pick when the caps are rounded, and the edges begin to unfurl (but are still slightly curled). They can go from perfectly ready to over-mature in just a few hours, so once the caps begin to flatten, check on them a few times a day. Once you notice the edges of the caps begin to unfurl, it’s time to pick!

Not quite ready and may not have a fully developed flavor.

Perfect time to harvest! Your mushrooms should be firm and slightly moist when you pick them.

These brown oysters are ready to pick!.
6. Harvest your mushrooms by gently twisting at the base of the cluster.
7. Store your fresh Oyster mushrooms in a brown bag for up to 7 days in the refrigerator. Always wash and cook before consumption.
8. Oftentimes you can successfully grow a second (and third!) harvest by flipping the bag over and restarting the process from the opposite side. Once your block is no longer producing, check out our blog post for ways to give your used block a new life.
-
Oyster varieties are ready to harvest when the cap edge’s start to uncurl.
Chestnuts are ready to harvest when the caps begin to flatten but are stil rounded.
Lion’s Mane is ready for harvest once the spines elongate to approximately 1/4 inches.
Gently twist your mushrooms from the base to harvest. All mushrooms should be washed and cooked before consumption.
-
Avoid water pooling on the block surface.
Avoid placing your block in areas near direct heat or air conditioning.
Check out our “Varieties” page for variety specific information.
All mushrooms should be washed and cooked before consumption.
Check out this blog post for what you can do with your block after it’s done fruiting .
Visit our FAQ page for even more information.